Build a Browser Synth with p5.js
· Tutorial
➡️ Try out the sketch described in this article via the online p5.js editor here
In this article, we’ll build a basic synthesizer in the web browser. We’ll learn how to use the PolySynth() function in p5 and we’ll add touchscreen capabilities so we can play our synth on mobile devices.
Write some pseudocode
First, let’s work out what we need to do. We need to design a visual interface for our synthesizer in the browser window. Let’s draw five vertical bars across the screen. Each bar will have a unique colour and will play one musical note.
We’ll add a volume slider to the top of the interface, leaving a top margin to separate the volume control from the keys.
How are we going to connect our five bars to the musical notes of the synth, assuming that each bar stands for one note? Five bars suggests a five-note scale.
Let’s choose F-minor pentatonic: F, A-flat, B-flat, C and E-flat.
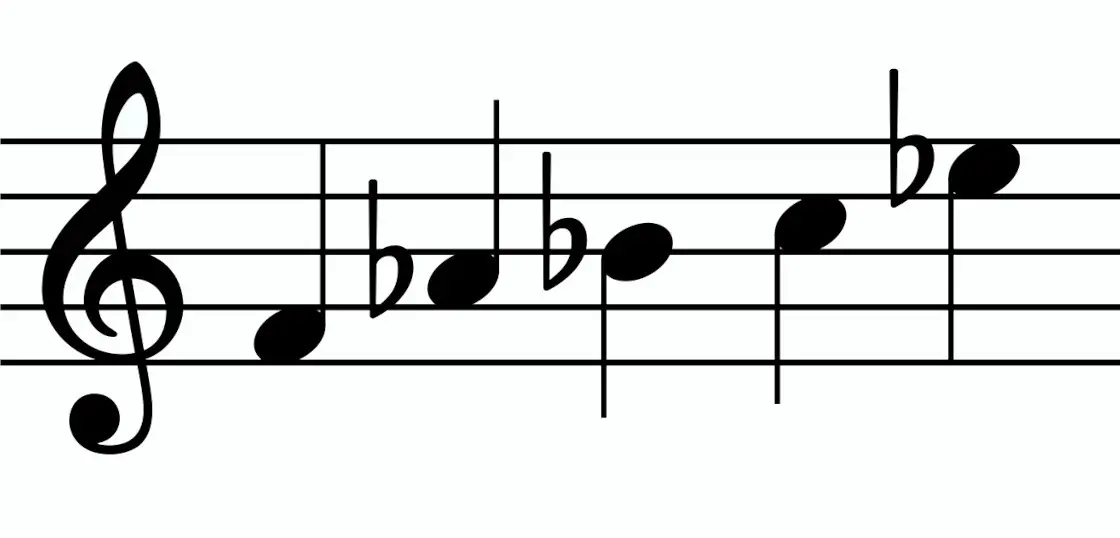
Here’s our task list, in pseudocode:
/* Task list in pseudocode

1. Create a visual interface by drawing
five, vertical bars across the screen.

1. Set up the sound element so that we
can play an f minor pentatonic scale.

1. Add interactivity so that musical notes
are heard when we click (mouse/computer)
or touch (mobile devices) the bars.

*/
Draw the bars
We’ll start by declaring the following variables and arrays:
numBarsa variable for the number of barsbarsan array to hold each individual bar as an objectxBaran array to hold the x coords of the LH side of each barclran array of colors for the barsnotesarray to store the frequencies of each note of an f minor pentatonic scale
let numBars = 5;
let bars = [];
let xBar = [];
let clr = ['#326CAD', '#9CAD3B',
'#61A9FA', '#FA857A', '#DFFA48'];
let notes = [];
Then, in setup(), we’ll create a canvas and give it a grey background. The createCanvas() function uses the built-in variables in p5 for the current width and height of the user’s browser window. This means that our synthesizer will take up the whole of the browser, whatever its dimensions at the time of running the programme.
We’re also going to write a loop in setup() that calculates the x coordinate of the left-hand side of each bar and stores that value in the xBar array. This will be useful because the p5 function rect() takes an argument for the starting x position of the rectangle, as well as its width and height.
To do this we will calculate the width of the bars then multiply this width by the current bar number or ID. Finally, we will store the x-position for the current bar in the array, xBar. Here’s the code:
for (let i = 0; i < numBars; i++) {
 let w = windowWidth / numBars;
 let x = w * i;
 xBar.push(x);
}
Make each bar an object
We’re going to make each bar an object. This will be useful when we need to find out whether a user’s finger or mouse is touching or clicking a particular bar.
To make each bar an object, we need to write a constructor function. This is a kind of template that lets you make specific instances of a general thing.
To keep things organized, we’ll write the code for the constructor function in a separate javascript file called bar.js.
We’ll need to remember to add a link to the bar.js file in the index.html file. Otherwise, the browser won’t be able to find the code for building the bars.
The constructor is to make a general thing called Bar which has a specific id. It will include a function (this.display()) that actually displays the bar. It will also include code to turn off the shape outline (using noStroke) and fill the bar with the relevant colour stored in the clr array. Finally, it will draw the bar using the rect() function.
Here’s the code:
function Bar(id) {
 this.display = function () {
 noStroke();
 fill(clr[id]);
 rect(xBar[id], 50, windowWidth / numBars, windowHeight);
 }
}
And here is the code we need to add to the <body> section of the index.html file. We’ll add it just below the reference to the sketch.js file.
<script src="bar.js"></script>The constructor function
The constructor function includes a parameter called id. This lets us pass an argument to the constructor to identify each new bar that we want build.
Having this id parameter will be really useful when we want to ask questions like, ‘what colour should the second bar be?’.
To answer a question like that we will need to look up the relevant hexadecimal value in the clr array of colour values.
The id parameter will also be useful when we want to know the x position of the left-side of a particular bar in the xBar array.
Fortunately, there’s a straightforward way of setting this id by using the i variable in the for() loop. This variable will be passed to the constructor function and give each bar its own, unique id, i.e. 0, 1, 2 etc.
Now we just need to write a loop that actually draws the bars across the screen. We can do this using the word ‘new’ to activate the constructor function.
Using a for() loop is an efficient way of doing the same thing five times. It lets us create five separate bars, each with their own color and x position.
This loop will create each bar in a few lines of code, adding (‘pushing’) each new bar to the array of bars called bars. It will display each bar by calling the .display() method.
Here’s the code:
for (let i = 0; i < numBars; i++) {
 bars.push(new Bar(i));
 bars[i].display();
}
Put the bars in an array
Each time we create a new bar, we store it in the array called bars[] using the .push(). Pushing every bar to an array lets us keep track of each one as it’s created.
Having all the bars stored in one place (in an array) will make it easier when we need to check whether any of the bars are currently being played by the user.
Notice that the integer i has a value between 0 and 4. We use this value for incrementation in the for() loop. As mentioned, it also becomes the id for each new bar when we pass it to the constructor.
And remember that computers count from zero, so bar 1 is actually bar 0 and bar 5 is actually bar 4 etc.
We now have five bars, each of which is a unique object made by the constructor function.

Set up the synth
Now that the visual interface is done, we need to get the sound working. We’ll use the built-in polyphonic synthesizer in p5 called, polySynth();
First, we need a variable for the synth itself. We will also initialize the array by populating it with the notes of the synth (frequency values, in Hz):
let polySynth;
let notes = [349.23, 415.30, 466.16, 523.25, 622.25, 698.46];
The notes array stores the frequencies of the notes of the f-minor pentatonic scale. You can find pitch-frequency values on the web using charts such as this one.
We need to initialize the synthesis. This is something we’ll do in setup(), using the built-in p5.PolySynth() to initialize our synthesizer instrument.
We use the word new to make a new instance of PolySynth(), much like we did with Bar().
polySynth = new p5.PolySynth();Next, let’s set an envelope for our synth. You can find the parameters for the .setADSR method in the p5 reference here.
We’ll use an attack of 0.1 seconds, a decay of 0.4 seconds, a sustain ratio of 0.3 and a release of 0.05 seconds.
polySynth.setADSR(0.1, 0.4, 0.3, 0.05);Make it interactive
Let’s design our synth so that it’s playable in a browser window on touchscreen or mobile devices. We’ll need to connect the visual and sonic aspects of our sketch so that when we touch a bar we play one of the notes of the pentatonic scale.
We do this by writing a p5 function that is called whenever the screen is touched. This function will default to mouse clicks when a touchscreen isn’t present.
function touchStarted() {
  // some code
}
Inside this function we want to run a loop that looks through all the bars stored in the bars array and asks––for every bar––whether the user’s finger is currently touching that particular bar.
We use a for() loop to cycle through the five Bar objects and call a method called played() for each bar.
function touchStarted() {
 for (let i = 0; i < numBars; i++) {
  bars[i].played();
 }
}
This method will go inside the Bar(id) constructor function and will include a conditional statement which will query whether the finger is over the bar.
this.played = function () {
 if (mouseY > 50 && mouseX > xBar[id] && mouseX < (xBar[id] + (windowWidth / numBars))) {
 polySynth.play(notes[id], 0.5, 0, 0.2 );
 }
}
The conditional here is a simple mouseover query. It takes into account the grey bar that contains the volume slider at the top of the screen by including a 50 pixel offset (mouseY > 50).
The reason for this offset is so that the user can change a volume slider (which we’ll add shortly) without actually playing any of the bars.
If the conditional is true then the .play() method is called on the PolySynth(). The play() method accepts arguments to determine the note, velocity, seconds from now and sustain time.
We use the id parameter to access the correct note frequency for the relevant bar being played.
Give the user control
One other thing: it’s best practice to give the user control over starting any audio inside a web browser. P5 has a function to let you do that called userStartAudio().
We can add this userStartAudio() function to the top of the touchStarted() function in sketch.js.
function touchStarted() {
 userStartAudio();
 for (let i = 0; i < numBars; i++) {
  bars[i].played();
 }
}
The touchStarted() function responds to touch interaction on mobiles. But it also works according to mouse click, if the programme is alternatively run in a browser on a computer screen.
Add a volume slider
One final thing, which is also good practice for web audio, is to give the user the option to adjust the volume using a volume slider.
If you want to know more about adding sliders, see my previous article on sound manipulation in the browser with p5.js.
First the variable:
let volSlider; Then in setup():
volSlider = createSlider(0, 1, 0.5, 0);
volSlider.position(25, 25);
textSize(16);
fill(0);
text('volume', 25, 20);
Finally, we need to write some code that constantly checks for any changes to the slider. It should do this for as long as the programme is running and update the volume of the synth accordingly.
This line goes inside draw().
outputVolume(volSlider.value(), 0.025);Here we put 25 ms (0.025s) of ramp time between each tick of the slider. This reduces any annoying audio glitches when adjusting the volume while the sound is still playing.
And that’s it. Now we have a basic synth inside the web browser.
The complete sketch
Here’s the code in full:
/* Touch-Bar Synth
Nicholas Brown, 2023 */

// sketch.js

let numBars = 5;
let bars = [];
let xBar = [];
let clr = ['#326CAD', '#9CAD3B',
'#61A9FA', '#FA857A', '#DFFA48'];
let notes = [349.23, 415.30, 466.16,
523.25, 622.25];
let volSlider;
let polySynth;

function setup() {
  createCanvas(windowWidth, windowHeight);
  background(220);
  for (let i = 0; i < numBars; i++) {
    let w = windowWidth / numBars;
    let x = w * i;
    xBar.push(x);
  }

  for (let i = 0; i < numBars; i++) {
    bars.push(new Bar(i));
    bars[i].display();
  }

  volSlider = createSlider(0, 1, 0.5, 0);
  volSlider.position(25, 25);
  textSize(16);
  fill(0);
  text('volume', 25, 20);

  polySynth = new p5.PolySynth();
  polySynth.setADSR(0.1, 0.4, 0.3, 0.05);
}

function draw() {
  outputVolume(volSlider.value(), 0.025);
}

function touchStarted() {
  userStartAudio();
  for (let i = 0; i < numBars; i++) {
    bars[i].played();
  }
}

function Bar(id) {

  this.display = function () {
    noStroke();
    fill(clr[id]);
    rect(xBar[id], 50, windowWidth / numBars, windowHeight);
  };

  this.played = function () {
    if (
      mouseY > 50 &&
      mouseX > xBar[id] &&
      mouseX < xBar[id] + windowWidth / numBars
    ) {
      polySynth.play(notes[id], 0.5, 0, 0.2);
    }
  };
}
Frequently Asked Questions
-
What is the purpose of the PolySynth in this tutorial?
PolySynth is a built-in p5.js function for creating polyphonic synthesizers. It allows you to play multiple notes simultaneously and control their characteristics like envelope and duration.
-
How can I customize the scale used in the synthesizer?
You can change the notes array to include the frequencies of a different scale. Use resources like frequency charts to find the corresponding Hz values for your desired notes.
-
Can this code be adapted for more bars or a larger scale?
Yes, you can increase the numBars variable and update the notes array to include more note frequencies. Ensure that the clr array also has enough colors to match the bars.
-
Does this synth work on mobile devices?
Yes, the synth is designed to support both touch interactions and mouse clicks. The touchStarted function ensures compatibility across devices.
-
What is userStartAudio(), and why is it necessary?
userStartAudio() is required to enable audio playback in browsers. Most modern browsers block audio unless initiated by a user interaction, like a touch or click.